apt installを使わずにTeXLiveを導入する

TeX ディストリビューション

Linux で TeX 環境を構築するには,2つの方法があります.

  1. 使用している Linux ディストリビューションのパッケージ管理システムから TeX Live のパッケージをインストールする.
  2. TeX Live のインストーラを使ってインストールする.

前者の場合は,他のパッケージと同様に統一的な管理ができますが,ディストリビューションによっては提供されているパッケージのバージョンが古いことがあります. 後者の場合は,パッケージ管理システムによる管理からは外れてしまいますが,tlmgr を使って最新の状態にアップデートし続けることが可能です.

TeX Live のインストール †

TeX Live のインストールガイド

に従えばよいですが,このページでもネットワークインストーラを使う場合について簡単に説明します.

まず,ミラーサイトから install-tl-unx.tar.gz をダウンロードします.

※ wget を使用する場合

$ wget http://mirror.ctan.org/systems/texlive/tlnet/install-tl-unx.tar.gz

※ curl を使用する場合

$ curl -O http://mirror.ctan.org/systems/texlive/tlnet/install-tl-unx.tar.gz

install-tl-unx.tar.gz を展開します.

$ tar xvf install-tl-unx.tar.gz

展開したインストーラのディレクトリに移動します.

$ cd install-tl*

root 権限でインストーラを実行します. オプションでダウンロードするリポジトリを指定できます.

$ sudo ./install-tl -no-gui -repository http://mirror.ctan.org/systems/texlive/tlnet/

...
Actions:
 <I> start installation to hard disk
 <H> help
 <Q> quit
Enter command: I

I を入力してインストールを開始します. サーバーの接続エラーが発生したり,何らかの理由により取得したアーカイブに問題があったりした場合はインストールが途中でストップします. この場合は,以下のコマンドで途中から再開できたりできなかったりします.

Scratch bufferを付箋として使う

Alt Text

Emacsのscratchバッファーを簡易メモとして使うために作られたパッケージはいくつかありますが、設定だけで実現できる簡単なものを紹介します。必要な手順は以下の通りです。

  1. Scratch buffer を kill させない。
  2. Scratch buffer の内容を記憶させる。
  3. ワンキーで Scratch bufferを表示させる。

Scratch buffer を kill させない

特にpackageを導入せずともemacsの標準機能で実現できます。

;;;;;;;;;;;;;;;;;;;;;;;;;;;;;;;;;;;;;;;;;
;; Set buffer that can not be killed.

(with-current-buffer "*scratch*"
  (emacs-lock-mode 'kill))

設定反映後、scratch bufferを kill-buffer すると Buffer "*scratch*" is locked and cannot be killed とmessageがでます。

Scratch buffer の内容を記憶させる

persistent-scratch というpackageもありますが、大方のemacserは使っていると思う auto-save-buffers-enhanced の設定で実現できます。

;;;;;;;;;;;;;;;;;;;;;;;;;;;;;;;;;;;;;;;;;
;; auto-save-buffers-enhanced

(setq auto-save-buffers-enhanced-quiet-save-p t)
;; scratch bufferを `~/.emacs.d/scratch` に保存
(setq auto-save-buffers-enhanced-save-scratch-buffer-to-file-p t)
(setq auto-save-buffers-enhanced-file-related-with-scratch-buffer
      (locate-user-emacs-file "scratch"))
(auto-save-buffers-enhanced t)

ワンキーで Scratch bufferを表示させる

popwinの機能を使います。my:pop-scratch を起動するとscratch bufferがpopupします。メモしたあと C-g で隠せるので便利です。

;;;;;;;;;;;;;;;;;;;;;;;;;;;;;;;;;;;;;;;;;;;;;;
;; Popup the scratch buffer

(bind-key
 "s-x"
 (defun my:pop-scratch ()
   "Popup the scratch buffer."
   (interactive)
   (setq popwin:special-display-config '("*scratch*"))
   (display-buffer "*scratch*")))

mac⌘英かな.appをEmacs専用に使う

macのkeyboard customizerとしては、 Karabiner-Element が有名ですが、Emacs専用として使うなら ⌘英かな.app が超簡単でおすすめです。

コンセプト

通常は、他のキーと組み合わせて機能させる修飾キー、Command_L command_R Option_L Fn かな は単独では何も仕事をしません。そこで、⌘英かな.appを使ってEmacsのキーバインドを割り当てようというものです。

比較的頻繁に操作するキーバインドを以下のように設定すればワンキー操作で動きます。いづれもFunctionキーに割り当てるという発想もありますが、手近な修飾キーを利用することでより便利に操作できます。

キーリマップ

key remap command
Command_L C-g keyboard-quit
Command_R s-m mozc-temp-convert
Option_L s-n neo-tree-toggle
Fn C-j emmet-expand-line
かな s-j toggle-input-method

設定法

EmacsのFunction key設定を公開

あまり役に立つTipsではありませんが、自分の設定を公開します。みなさんの「私の場合は…」というのを教えていただけると嬉しいです。

F1:help-command

F1は、Deaultでいろんなhelp-commadへのprifixとして設定されているのでそのまま使います。which-key.el を導入することで各コマンドのガイドがミニバファーに表示されるので便利です。 Alt Text

;;;;;;;;;;;;;;;;;;;;;;;;;;;;;;;;;;;;;;;;
;; which-key
(require 'which-key)
(add-hook 'after-init-hook #'which-key-mode)

F2:hydra-compile

一般的には此処に、M-x compileを割り当てている人が多いと思います。私はいろんな作業をmakefaileで自動化しているので目的に応じてコマンドが使えるようにhydraでメニューを設定して割り当てています。

Alt Text

;;;;;;;;;;;;;;;;;;;;;;;;;;;;;;;;;;;;;;;;;
;; compile

(bind-key
 [f2]
 (defhydra hydra-compile (:color red :hint nil)
   "
 🗿 Compile: make _k_  _a_ll  _u_pftp  _m_ove  _b_klog  _g_it  _c_lean   🐾 "
   ("k" my:make-k :exit t)
   ("a" my:make-all :exit t)
   ("u" my:make-upftp :exit t)
   ("m" my:make-move :exit t)
   ("g" my:make-git :exit t)
   ("b" my:make-bklog :exit t)
   ("c" mymake-clean)))

F3:iconify-or-deiconify-frame

emacsclient使用時という条件下でフレームのポップアップ/最小化をtoggleさせます。

;;;;;;;;;;;;;;;;;;;;;;;;;;;
;; iconify-or-deiconify-frame

(bind-key "<f3>" 'iconify-or-deiconify-frame)

F4:Toggle current buffer and scratch buffer.

カレントバッファーとScrtchバッファーとをtoggleさせます。

;;;;;;;;;;;;;;;;;;;;;;;;;;;;;;;;;;;;;;;;;;;;;;
;; Toggle current buffer and `*scratch*` buffer

(defvar toggle-scratch-prev-buffer nil)
(defun toggle-scratch()
  "Toggle current buffer and *scratch* buffer."
  (interactive)
  (if (not (string= "*scratch*" (buffer-name)))
      (progn
	(setq toggle-scratch-prev-buffer (buffer-name))
	(switch-to-buffer "*scratch*"))
    (switch-to-buffer toggle-scratch-prev-buffer)))
(bind-key "<f4>" 'toggle-scratch)

F5:quickrun

ごくたまに perlruby などのミニスクリプトを自作することもあるのでquickrunで簡単に試運転できるようにしています。

Hide .DS_Store file from Emacs

.DS_StoreファイルをMacから削除する…というTipsは山ほどあるのですが、いづれもいつの間にかまた復活してしまいます。なので私の場合は、Emacsの各シーンで非表示になるように設定しています。

counsel

(setq counsel-find-file-ignore-regexp (regexp-opt '(".DS_Store")))

dired

;; omit .DS_Store
(require 'dired-x)
(setq-default dired-omit-files-p t)
(setq dired-omit-files "^\\.DS_Store")

neotree

;; Patched to allow everything but .DS_Store
;; Tips from https://github.com/syl20bnr/spacemacs/issues/2751
(with-eval-after-load 'neotree
  (defun neo-util--walk-dir (path)
    "Return the subdirectories and subfiles of the PATH."
    (let* ((full-path (neo-path--file-truename path)))
      (condition-case nil
	  (directory-files
	   path 'full "^\\([^.]\\|\\.[^D.][^S]\\).*")
	('file-error
	 (message "Walk directory %S failed." path)
	 nil)))))

view-modeを超えるhydra-pinkyの設定

私のEmacs設定は、プログラマー masasamさんのブログ「 Solist Work Blog」から多くのことを吸収して日々成長しています。 そのブログの中にあるEmacs Pinkyをhydraで解決する の記事からhydra-pinkyの設定を参考にして更に使いやすくカスタマイズしてみました。

Screen Shot

hydra-pinky

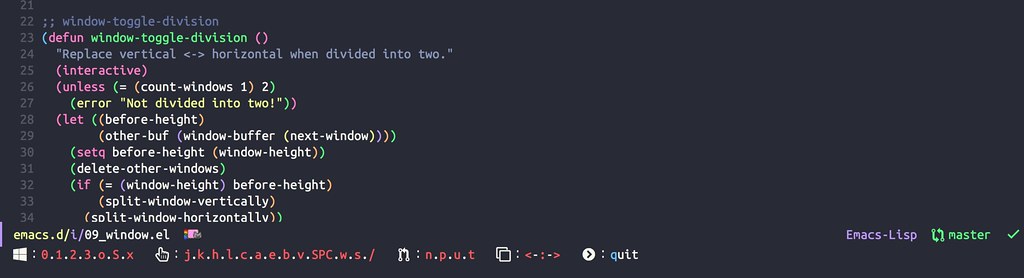
hydra-pinky を発動するとミニバッファーに赤文字のメニューがでてきます。 hydra発動中はこの表示が続くのでわかりやすいです。 赤い表示のキーをタイプしている間はいつまでたってもhydraは解除されません。 hydraが終了する条件は、定義された赤いキー以外をタイプするか、青文字の “q”:quit を押した場合です。

つまりhydra-pinkyは、発動中はvew-modeに似た動作をし、そこから抜けると普通の編集モードに戻る…という仕組みです。 複雑なキーバインドを覚える必要もなくGUIでスピーディーにキー操作できるのはとてもありがたいです。 私自身はもともとブラインドタッチを使えないのでEmacs-pinkyの他にもいろいろhydraを活用しています。

HydraでEmacsのキーバインド問題を解消

sequential-command

rubikitch/sequential-command

Emacsを再起動して、C-a C-a C-aすると、行頭にいって、バッファーの頭にいって、元に戻る。 また、C-e C-e C-eすると行頭にいって、バッファーの頭にいって、元に戻るというシンプルな機能ですが、なにげに便利です。

pinkyでは、“a”,“e"キーに割り当てています。

window-toggle-division

Windowの縦分割、横分割をtoggleで切り替えします。

iflipb:バッファー移動

バッファー移動は、next-buffer previous-buffer を使ってもいいのですが、不要なbufferはignoreしてくれるfilipbを使います。 Emacs:タブを使わない究極のバッファー移動

矢印キーの扱い

Emacserの方から見ると邪道だと言われそうですが、私はカーソル移動に矢印キーを使うことも多いです。基本は、h,j,k,lを使うようにしていてもうっかり矢印キーに触れるとhydra-pinkyが消えてしまうので、pinky発動中は矢印関係の操作で消えないようにしています。

設定

;; sequential-command
(use-package sequential-command-config
  :commands sequential-command-setup-keys
  :hook (after-init . sequential-command-setup-keys))

;; other-window-or-split
(bind-key
 "C-q"
 (defun other-window-or-split ()
   "If there is one window, open split window.
If there are two or more windows, it will go to another window."
   (interactive)
   (when (one-window-p)
     (split-window-horizontally))
   (other-window 1)))

;; window-toggle-division
(defun window-toggle-division ()
  "Replace vertical <-> horizontal when divided into two."
  (interactive)
  (unless (= (count-windows 1) 2)
    (error "Not divided into two!"))
  (let ((before-height)
        (other-buf (window-buffer (next-window))))
    (setq before-height (window-height))
    (delete-other-windows)
    (if (= (window-height) before-height)
        (split-window-vertically)
      (split-window-horizontally))
    (other-window 1)
    (switch-to-buffer other-buf)
    (other-window -1)))

;; iflipb
(setq iflipb-wrap-around t)
(setq iflipb-ignore-buffers (list "^[*]" "^magit" "dir]$"))

;; Hydra-pinky
(bind-key [f11] 'hydra-pinky/body)
(key-chord-define-global
 "::"
 (defhydra hydra-pinky (:color red :hint nil)
   "
 :_0_._1_._2_._3_._o_._S_._x_   :_j_._k_._h_._l_._c_._a_._e_._b_._v_._SPC_._w_._s_._/_   :_n_._p_._u_._t_   :_<_-_:_-_>_   :_q_uit"
   ;; window
   ("0" delete-window)
   ("1" delete-other-windows)
   ("2" split-window-below)
   ("3" split-window-right)
   ("o" other-window-or-split)
   ("S" window-swap-states)
   ("x" window-toggle-division)
   ;; page
   ("a" seq-home)
   ("e" seq-end)
   ("j" next-line)
   ("k" previous-line)
   ("l" forward-char)
   ("h" backward-char)
   ("c" recenter-top-bottom)
   ("<down>" next-line)
   ("<up>" previous-line)
   ("<right>" forward-char)
   ("<left>" backward-char)
   ("<C-up>" backward-paragraph)
   ("<C-down>" forward-paragraph)
   ("<C-left>" left-word)
   ("<C-right>" right-word)
   ("b" scroll-down-command)
   ("v" scroll-up-command)
   ("SPC" set-mark-command)
   ("w" avy-goto-word-1)
   ("s" swiper-isearch-region)
   ;; git
   ("n" git-gutter:next-hunk)
   ("p" git-gutter:previous-hunk)
   ("u" git-gutter:popup-hunk)
   ("t" git-gutter:toggle-popup-hunk)
   ;; buffer
   ("/" kill-buffer)
   (":" counsel-switch-buffer)
   ("<" iflipb-previous-buffer)
   (">" iflipb-next-buffer)
   ;; quit
   ("q" nil)))

neotreeを試してみる

以下の機能を盛り込んで実用的なneotreeの設定を試してみました。

  1. アイコン表示(use all-the-icons)
  2. 文字サイズの変更(縮小)
  3. キーマップスタイルの変更(ワンキーで使う)
  4. ファイルオープン時にneotreeバッファーを隠す

NeoTree

設定

(use-package neotree
  :commands (neo-smart-open neo-create-file-auto-open)
  :init
  (setq-default neo-keymap-style 'concise)
  :config
  (setq neo-smart-open t)
  (setq neo-create-file-auto-open t)
  (setq neo-theme (if (display-graphic-p) 'icons 'arrow))
  (bind-key [f8] 'neotree-projectile-toggle)
  (bind-key "a" 'neotree-hidden-file-toggle neotree-mode-map)
  (bind-key "<left>" 'neotree-select-up-node neotree-mode-map))


;; Change neotree's font size
;; from https://github.com/jaypei/emacs-neotree/issues/218(setq-default neo-show-hidden-files t)
(defun neotree-text-scale ()
  "Text scale for neotree."
  (interactive)
  (text-scale-adjust 0)
  (text-scale-decrease 1)
  (message nil))
(add-hook 'neo-after-create-hook
	  (lambda (_)
	    (call-interactively 'neotree-text-scale)))


;; Hide neotree window after open file
;; from https://github.com/jaypei/emacs-neotree/issues/77
(add-hook 'neo-enter-hook
          (lambda (type & rest)
           (if (equal type 'file)
               (neotree-hide))))

swiper-region / swiper-isearch-region

swiper/swiper-isearchをregion選択からも使えるようにするための設定。isearchではmigemoも使えるようにした。

(with-eval-after-load 'ivy' としているのは、(use-package avy-migemo-e.g.swiper)を遅延ロードさせてEmacsの起動時間を短縮するため。

設定

(defun swiper-isearch-region ()
  "If region is selected `swiper-isearch' with the keyword selected in region.
If the region isn't selected `swiper-isearch'."
  (interactive)
  (if (not (use-region-p))
      (swiper-isearch-migemo)
    (deactivate-mark)
    (swiper-isearch (buffer-substring-no-properties
		     (region-beginning) (region-end)))))

(defun swiper-region ()
  "If region is selected `swiper' with the keyword selected in region.
If the region isn't selected `swiper'."
  (interactive)
  (if (not (use-region-p))
      (swiper)
    (deactivate-mark)
    (swiper (buffer-substring-no-properties
	     (region-beginning) (region-end)))))

(with-eval-after-load 'ivy
  (use-package avy-migemo-e.g.swiper)
  (defun swiper-isearch-migemo ()
    "Using migemo with `swiper-iserach'."
    (interactive)
    (avy-migemo-mode 1)
    (swiper-isearch)
    (avy-migemo-mode 0)))

avy-migemo でエラー発生

avy、swiper、counsel の最近の仕様変更により関数名などが変わったため現状ではエラーが出るようになった。その対応のために下記のPRが出されているがまだマージされていないようなので、自分で差し替えて使っている。

Macにe2psをインストールする

WtSeries : UNIXソフトからe2psをダウンロードして解凍します。 現在の最新バージョンは、e2ps-4.34

解凍フォルダー内のps-font.cをエディタで開き、14~53行の行末にバックスラッシュを追加します。

char *gsFonts = "Times-Roman\
Times-Italic\
Times-Bold\
Times-BoldItalic\
Helvetica\
Helvetica-Oblique\
Helvetica-Bold\
Helvetica-BoldOblique\
Courier\
Courier-Oblique\
Courier-Bold\
Courier-BoldOblique\
Symbol\
AvantGarde-Book\
AvantGarde_BookOblique\
AvantGarde_Demi\
AvantGarde_DemiOblique\
Bookman-Light\
Bookman-LightItalic\
Bookman-Demi\
Bookman-DemiItalic\
Helvetica-Narrow\
Helvetica-Narrow-Oblique\
Helvetica-Narrow-Bold\
Helvetica-Narrow-BoldObliqeu\
NewCenturySchlbl-Roman\
NewCenturySchlbl-Italic\
NewCenturySchlbl-Bold\
NewCenturySchlbl-BoldItalic\
Palatino-Roman\
Palatino-Italic\
Palatino-Bold\
Palatino-BoldItalic\
Zapfchancery-MediumItalic\
ZapfDingbats\
Ryumin-Light.Hiragana\
Ryumin-Light.Katakana\
Gothic-Meduim.Hiragana\
Gothic-Medium.Katakana\
";

terminalで解凍フォルダー内に移動します。

cd e2ps-4.34

続いて以下のようにmakeします。

make
sudo make install

/usr/local/bin に e2ps と e2lpr がインストールされていたら成功です。

direx-project + popwinで快適なディレクトリツリー環境を構築する

Alt Text

Emacsでディレクトリツリーを表示させるパッケージにはいくつかの選択肢があります。neotreeが人気のようですが表示幅が自由にカスタマイズできないのでiconモードで使うとややストレスです。私は、direxが使いやすいので愛用しています。

例によってパッチワークですが、設定を公開します。特徴として以下の機能を持ちます。

  • フォルダー表示はビジュアルにしたいのでunicodeの絵文字を使う。
  • popwinを使うことで表示幅を自由に設定できる。(q または C−g で隠せる)
  • project内にいるなら、direx-projectを起動し、そうでなければ普通にdirexを起動する(これが気に入っています)
  • https://blog.shibayu36.org/entry/2013/02/12/191459

設定

;; direx
(use-package direx)
(setq direx:leaf-icon "  " direx:open-icon "📂" direx:closed-icon "📁")
(push '(direx:direx-mode :position left :width 35 :dedicated t)
      popwin:special-display-config)
;; use direx-project.el
;; https://blog.shibayu36.org/entry/2013/02/12/191459
(bind-key
 [f11]
 (defun direx:jump-to-project-directory ()
   "If in project, launch direx-project otherwise start direx."
  (interactive)
  (let ((result (ignore-errors
                  (direx-project:jump-to-project-root-other-window)
                  t)))
    (unless result
      (direx:jump-to-directory-other-window)))))