Emacs

メモ機能に特化した超シンプルなhowm+Dropboxの設定

メモ機能に特化したhowmの設定を紹介します。

  • GTDとしては使わないのでメニュー画面は使いません。
  • メニュー画面は使いませんが検索などの基本機能は全て使えます。
  • 新規投稿と一覧表示のみ直接使えるようにkey-bindしています。
  • ファイルは、スマホや他の端末からも共有出来るようにDropboxで管理します。
  • メモは、markdown-mode で書きます。理由は後述します。

howm-memoの設定

;*************************************************************************
;; howm-memo.el                       last updated: 2017/06/09
;*************************************************************************
;; M-x package-install howm
;; (use-package key-chord)
;; (use-package use-package-chords
;;   :config (key-chord-mode 1))
;;-----------------------------------------------------------------------
(use-package howm
  :init
  (setq howm-view-title-header "#"
        howm-directory "~/Dropbox/howm"
        howm-file-name-format "%Y/%m/%Y-%m%d-%H%M.md"
  :config
  (setq howm-view-split-horizontally t      ;; 一覧バッファと内容バッファを横に並べる
        howm-view-summary-persistent nil    ;; RET でファイルを開く際一覧バッファを消す
  :chords ((",," . howm-create)             ;; メモを書く
           ("@@" . howm-list-all)))         ;; メモ一覧を開く

;; 空になったファイルを尋ねずに自動削除:howm以外でも有効
(defun my:delete-file-if-no-contents ()
  (when (and (buffer-file-name (current-buffer))
             (= (point-min) (point-max)))
    (delete-file
     (buffer-file-name (current-buffer)))))
(if (not (memq 'my:delete-file-if-no-contents after-save-hook))
    (setq after-save-hook
          (cons 'my:delete-file-if-no-contents after-save-hook)))

;***********************************************************************
; end of file

mozc-tempを使ったモードレス日本語入力が快適

モードレスに魅せられて、ac-mozcを導入して使っていたが、新しいモードレスのコードで、mozc-tempなるものがあることを知った。早速使って見た。

mozc-tempのREADMEを見るとコンセプトがよく分かる。

mozc-tempはmozc.elによる入力をモードレス化するラッパーです。 ac-mozcをもとに作成されました。 基本的な挙動はac-mozcと同じになるように作られていて、全角文字と半角文字の混在する文章の入力を楽にすることを目的としています。 ac-mozcとの違いは、これがmozc.elのインターフェイスに対するラッパーであるということです。 そのため、変換時の候補選択はmozc.elのものと同じ操作が可能です。

Alt Text

導入

パッケージインストールで mozc-temp.elを入れて、init.elに以下を設定するだけ。

(global-set-key (kbd "s-j") #'toggle-input-method)
(global-set-key (kbd "s-m") #'mozc-temp-convert)

Alt Text

感想

ac-mozcを使ってモードレスの環境を試したことはあったが、拗音(っ)とかの変換がうまくできないので中途半端な印象でした。 その点mozc-tempはそうした問題もなくとても使いやすいです。

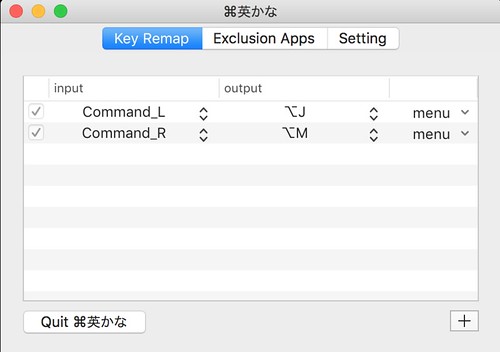
Emacsで快適にmozcを使うためには、Emacs使用時は、他の日本語入力メソッドが同時に機能しないようにコントロールすることがとても大切です。それぞれの環境によって工夫が必要ですが、わたしの場合(MaC)について、別Tipsで紹介していますので参考にしてください。

Mac+Emacs で emacs-mozc をかなキーで ON/OFF させる裏技

mozc_emacs_helper on macOS Sierra

macOS Sierra をクリーンインストールしたので mozc_emacs_helper を使えるようにした。google日本語入力と連携できるようにビルドできるという以下のサイトの Tips を参考にしたが、ちょっと解りにくかったので備忘録として整理しておく。

準備

Xcodeが必要と言うことだけどコマンドラインツールのみで大丈夫だった。

xcode-select --install

ninja が要るらしいので homebrew でインストールしておく。

brew install ninja

mozc をダウンロードする

作業ディレクトリはどこでもいいが、僕は基本的にdesktopで作業することが多い。

cd desktop
git clone https://github.com/google/mozc.git -b master --single-branch --recursive

Mac の google日本語入力と連携させるためにソースを修正

以下のファイルを作ってパッチをかけてもいいが、簡単なのでぼくは直接修正した。

diff --git a/src/build_mozc.py b/src/build_mozc.py
index a56aaaf..d419f49 100644
--- a/src/build_mozc.py
+++ b/src/build_mozc.py
@@ -167,6 +167,8 @@ def GetGypFileNames(options):
   # Include subdirectory of win32 and breakpad for Windows
   if options.target_platform == 'Windows':
     gyp_file_names.extend(glob.glob('%s/win32/*/*.gyp' % SRC_DIR))
+  elif options.target_platform == 'Mac':
+    gyp_file_names.extend(glob.glob('%s/unix/emacs/*.gyp' % SRC_DIR))
   elif options.target_platform == 'Linux':
     gyp_file_names.extend(glob.glob('%s/unix/*/*.gyp' % SRC_DIR))
     # Add ibus.gyp if ibus version is >=1.4.1.
diff --git a/src/mac/mac.gyp b/src/mac/mac.gyp
index 76b540d..2ee4006 100644
--- a/src/mac/mac.gyp
+++ b/src/mac/mac.gyp
@@ -586,7 +586,6 @@
             ['branding=="GoogleJapaneseInput"', {
               'dependencies': [
                 'DevConfirmPane',
-                'codesign_client',
               ],
             }],
           ],
           

コンパイル

cd mozc/src
GYP_DEFINES="mac_sdk=10.12 mac_deployment_target=10.12" python build_mozc.py gyp --noqt --branding=GoogleJapaneseInput
$ python build_mozc.py build -c Release unix/emacs/emacs.gyp:mozc_emacs_helper

動作確認

以下のように表示されれば成功!

livedown:markdownリアルタイムビューアーの導入

EmacsのMarkdown-modeビューアーは、multimarkdownが定番のようですが、プレビュー機能は専用エディタほどではありません。そこでお勧めしたいのがLivedownです。Livedownはオートリロード機能が備わっていますので、編集して保存するたびにプレビューが更新されます。できあがりが分かりやすく確認できるのでどんどん書き進められます。ぼくの場合、ちょこっとしたメモもMarkdownで書いているので、そのメモを印刷したい時にビューアーの表示をそのままプリントアウト出来るので便利です。

導入

導入は下記リンクに詳しく書かれているけど、README.mdの内容を転載しておこう。

Installation

First make sure you have node with npm installed.

Then install livedown with

$ npm install -g livedown

Then install this plugin with

git clone https://github.com/shime/emacs-livedown.git ~/.emacs.d/emacs-livedown
cat <<EOF >> ~/.emacs.d/init.el
(add-to-list 'load-path (expand-file-name "~/.emacs.d/emacs-livedown"))
(require 'livedown)
EOF

Configuration

This plugin uses some configurable variables, with the following defaults

(custom-set-variables
 '(livedown-autostart nil) ; automatically open preview when opening markdown files
 '(livedown-open t)        ; automatically open the browser window
 '(livedown-port 1337)     ; port for livedown server
 '(livedown-browser nil))  ; browser to use

Make sure to place them before the require line in your init.el.